I have been on a garden redo mission this spring and in completely changing up the space
I made the decision that I didn't want to use the wire cages for my tomato plants again this year.
It seems like I am always having to try to stake them up because they want to flop
over when my plants reach a certain size, so I started searching online for other options.
I found some that I felt like were a bit pricey that I was considering purchasing due to good reviews. However I ran across several idea's and variations of this idea on Pinterest, so I decided to go ahead and diy my cages this year. I could easily customize them to fit my raised garden beds. (plus they were much less expensive than the other option I was considering so it was worth a shot) 😉
I knew I wanted to double my garden in size so I have been able to get that done, I also
removed the mulch that I had as ground cover and chose to go with gravel.

At first I made some chicken wire covers that I attached on hinges to use to cover each raised bed, and they were very simple to flip up and work in the beds and then just flip it back down.. and I really liked the shorter ones, plus I knew it would protect my strawberries from the birds. :0)

However, I felt like the tall ones for tomato plants were going to be a big ol hassle to mess with,
especially as the plants grew taller so I knew I couldn't fit as many plants in a bed if I used the
covers, so on to a different solution!

While I had decorative fencing before, I changed that up to be functional and fingers crossed
keep the critters out. So while the fence isn't quite as pretty it definitely serves a purpose and
that wins out this time.
I changed out the soil (ca-ching $$$ 😳) and started my raised beds fresh this year, and now it is all sorts of protected. (hopefully)
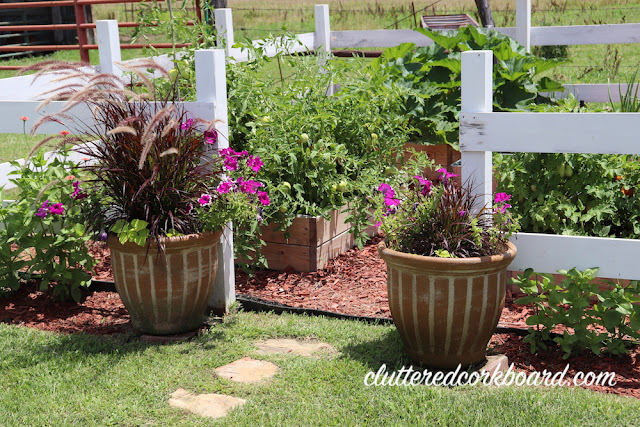
And as far as the pretty aspect goes, I am going to be planting up flower beds along
the front of my garden space as soon as the weather cooperates with me, and when I am able to find a few more plants that I want. Although I did order some online that arrived and are hanging out and ready for me to use.
Now back to the tomato cages. 😉

For the cages I chose to use 2 x 2's and 1 x 2's.
So I started by cutting all of the pieces of lumber that I needed and
then got to work on the assembly.
I cut the 2 x 2's to 4 feet in length which I used for the legs/uprights and I
chose to use 1 x 2's for the bracing or cross pieces for my cages.
For the front and back
panels I cut the 1 x 2's at 16" in length and spaced them at 15".
(here is a rough sketch of it.. lol) 😬 😂😂😂

After I had the front and back panels assembled, I put the 2 panels together using 3 more 1x2's
that I cut at 17.5" in length.

These could of course be customized to whatever size needed, that is just what I chose to use.
I used my brad nailer to put them together and it was a really simple process to do.
Each cage cost about $7.50 for me to build, but I know the price of lumber definitely varies in
different area's so that could be more/less.

tomato plants.


It was slightly more cost effective to make a large cage vs. building 4 more individual cages, so I decided to go ahead and give it a try.
I built it basically the same way, putting together the front/back panels first then finishing it up with side pieces and I also added center bracing as well.

I am really happy with how the tomato cages turned out, I think they look really nice in the garden, they seem very sturdy and they were definitely less expensive than some of the other options
I had been considering,
so as long as they last a few years I feel like they are well worth it.
If not I will be searching for another option and investing in something different.
Nothing like a homegrown tomato. 🍅


I made a video showing a little more detail of the building process and somewhat of a mini tour of my garden if you'd like to check it out.
If you'd like to see more video's/updates on my garden space just let me know in the comments.
Blessings
- Tina
Item details:
*Affiliate Links
If you like this post you can sign up for my blog post notification emails Here !
Or follow me on:
Note: As an Amazon Associate I earn from qualifying purchases!
This page contains affiliate links, which means I may earn a small commission on
items that are purchased through those links. Thank you for your support.
To see more about my: Disclosure Policy Click Here


No comments